llvm 입문하기(5)
이제 제어흐름을 만들 것이다.
목차 보기
이제 제어흐름을 만들 것이다.
분기와 반복을 추가하면 LLVM IR에서는 어떻게 표현되는지 알아보는 장이 될 것이다.
If/Then/Else
언어 자체에 제어흐름 개념을 확장하는 건 렉서, 파서, AST, IR생성기에 다 넣어주면 된다.
if~else 같은걸 만들고 싶은데 지금 언어에서는 모든 statement가 표현식이다. 그래서 조건문들도 다 표현식처럼 값을 반환해야된다.
예를 들어 C++에서는 이렇게 쓰던 것을
if (x < 3) {
  return 1;
} else {
  return fib(x - 1) + fib(x - 2);
}
cpp에서 이랬던 게 Kaleidoscope에서는 이렇게 된다.
if x < 3 then 1 else fib(x-1)+fib(x-2)
전체 if x < 3 then 1 else fib(x-1)+fib(x-2)가 하나의 값을 반환하는 형태가 되는데, 이건 3항 연산자랑 거의 비슷하다.
처음에는 이게 양쪽 값을 다 계산하고 고르는 건가 싶었는데 그건 아니다. 실제 제어 흐름은 then 또는 else 중 한쪽으로만 간다. 그래서 나중에 side-effect가 있는 함수 호출이 들어와도 양쪽이 다 실행되는 형태는 아니다.
Lexer 확장
우선 제어흐름문법을 인식하려면 그걸 토큰으로 받아올 수 있어야된다.
그래서 새 enum값을 추가한 뒤 lexer에 그 토큰을 인식하도록 수정한다.
// control
tok_if = -6,
tok_then = -7,
tok_else = -8,
...

if (IdentifierStr == "def")
  return tok_def;
if (IdentifierStr == "extern")
  return tok_extern;
if (IdentifierStr == "if")
  return tok_if;
if (IdentifierStr == "then")
  return tok_then;
if (IdentifierStr == "else")
  return tok_else;
return tok_identifier;
이러면 Lexer가 if x < 3 then 1 else 2이 코드에 대해서 아래처럼 쪼개준다.
tok_if
tok_identifier(x)
'<'
tok_number(3)
tok_then
tok_number(1)
tok_else
tok_number(2)
토큰처리를 안했으면 if도 그냥 일반 identifier로 분리됐을 것이다. 그러니까 변수로 처리됐을 거라는 의미다.
AST 확장
이제 새로운 표현식을 나타내기 위해서 AST노드를 추가한다.
/// IfExprAST - Expression class for if/then/else.
class IfExprAST : public ExprAST {
  std::unique_ptr<ExprAST> Cond, Then, Else;

public:
  IfExprAST(std::unique_ptr<ExprAST> Cond, std::unique_ptr<ExprAST> Then,
            std::unique_ptr<ExprAST> Else)
    : Cond(std::move(Cond)), Then(std::move(Then)), Else(std::move(Else)) {}

  Value *codegen() override;
};
복습을 하면, AST는 트리구조로 소스 코드를 표현한 것이다.
if x < 3 then 1 else fib(x-1)는 아래처럼 된다.
IfExprAST
├── Cond: x < 3
├── Then: 1
└── Else: fib(x-1)
멤버 선언을 unique_ptr로 해놔서 Cond, Then, Else는 IfExprAST가 소유하고 있는 노드라고 읽을 수 있다.
근데 타입이 전부 ExprAST다. 조건에도 식이 들어가고, then/else에도 식이 들어가기 때문이다. 숫자 하나가 올 수도 있고 함수 호출이 올 수도 있고 또 다른 if가 올 수도 있다.
Parser 확장
렉서에서 토큰 따오고, 만들 AST노드껍데기도 준비 됐으니 파싱로직을 구현해야 된다.
/// ifexpr ::= 'if' expression 'then' expression 'else' expression
static std::unique_ptr<ExprAST> ParseIfExpr() {
  getNextToken();  // eat the if.

  // condition.
  auto Cond = ParseExpression();
  if (!Cond)
    return nullptr;

  if (CurTok != tok_then)
    return LogError("expected then");
  getNextToken();  // eat the then

  auto Then = ParseExpression();
  if (!Then)
    return nullptr;

  if (CurTok != tok_else)
    return LogError("expected else");

  getNextToken();

  auto Else = ParseExpression();
  if (!Else)
    return nullptr;

  return std::make_unique<IfExprAST>(std::move(Cond), std::move(Then),
                                      std::move(Else));
}
조건문을 파싱하는 함수를 먼저 만들고
static std::unique_ptr<ExprAST> ParsePrimary() {
  switch (CurTok) {
  default:
    return LogError("unknown token when expecting an expression");
  case tok_identifier:
    return ParseIdentifierExpr();
  case tok_number:
    return ParseNumberExpr();
  case '(':
    return ParseParenExpr();
  case tok_if:
    return ParseIfExpr();
  }
}
이걸 primary expression에 추가해준다. 주석의 ::=는 좌항, 우항이 동일한 의미임을 뜻하는 기호다.
LLVM IR
이제 LLVM 코드 지원까지 해주면 일단 조건문 인식이 끝난다.
이런 코드를 입력한다고 해보자.
extern foo();
extern bar();
def baz(x) if x then foo() else bar();
최적화를 끄고 보면 대략 이런 IR이 나온다.
declare double @foo()

declare double @bar()

define double @baz(double %x) {
entry:
  %ifcond = fcmp one double %x, 0.000000e+00
  br i1 %ifcond, label %then, label %else

then:       ; preds = %entry
  %calltmp = call double @foo()
  br label %ifcont

else:       ; preds = %entry
  %calltmp1 = call double @bar()
  br label %ifcont

ifcont:     ; preds = %else, %then
  %iftmp = phi double [ %calltmp, %then ], [ %calltmp1, %else ]
  ret double %iftmp
}
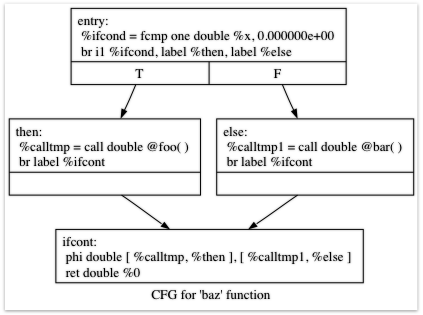
못보던 IR 문법들이 생겼다.
entry block에서는 조건을 계산한다. Kaleidoscope에서는 숫자 0.0을 false처럼 쓰고, 0이 아닌 값을 true처럼 쓴다. 그래서 조건 expression의 결과를 0.0과 비교한다.
%ifcond = fcmp one double %x, 0.000000e+00
fcmp one은 ordered and not equal 비교다. 간단히 말하면 NaN 같은 unordered 값이 아니고, 두 값이 같지 않으면 참이다. 여기서는 %x != 0.0 정도로 보면 된다.
그 다음은 조건 분기다.
br i1 %ifcond, label %then, label %else
%ifcond가 참이면 then block으로 가고, 거짓이면 else block으로 간다. 각 block은 자기 일을 끝낸 뒤 ifcont block으로 합쳐진다.
then, else가 끝나면 ifcont로 내려오는데, 조건문 이후 실행될 코드를 담당한다.
IR코드까지 잘 만들어지는 걸 확인했으면 값을 반환하는 일만 남았다. 전체 if expression도 하나의 값이어야 하니까 then으로 왔으면 foo()의 결과를, else로 왔으면 bar()의 결과를 써야 한다.
이걸 처리하는 게 phi node다.
%iftmp = phi double [ %calltmp, %then ], [ %calltmp1, %else ]
ifcont block에 들어오기 직전에 어떤 predecessor block을 거쳤는지 보고 값을 고른다. %then에서 왔으면 %calltmp, %else에서 왔으면 %calltmp1을 선택한다.
처음에는 phi가 조건문처럼 느껴졌는데 그건 아닌 것 같다. 조건을 다시 검사하지 않고, 이미 branch가 끝난 뒤에 "어느 block에서 왔냐"를 기준으로 값을 고르는 SSA용 장치다.
그리고 phi는 일반 instruction보다 앞에 있어야 한다. block 중간에 갑자기 phi가 나오면 LLVM 입장에서는 이상한 IR이 된다.
If/Then/Else 코드 생성
IR코드를 생성하기 위해 codegen 메서드를 구현해줘야한다.
Value *IfExprAST::codegen() {
  Value *CondV = Cond->codegen();
  if (!CondV)
    return nullptr;

  // Convert condition to a bool by comparing non-equal to 0.0.
  CondV = Builder->CreateFCmpONE(
      CondV, ConstantFP::get(*TheContext, APFloat(0.0)), "ifcond");
조건 표현식에 대한 코드를 생성한 다음, 그 값을 0과 비교해서 1비트 bool 값으로 만든다.
Function *TheFunction = Builder->GetInsertBlock()->getParent();

// Create blocks for the then and else cases.  Insert the 'then' block at the
// end of the function.
BasicBlock *ThenBB =
    BasicBlock::Create(*TheContext, "then", TheFunction);
BasicBlock *ElseBB = BasicBlock::Create(*TheContext, "else");
BasicBlock *MergeBB = BasicBlock::Create(*TheContext, "ifcont");

Builder->CreateCondBr(CondV, ThenBB, ElseBB);
Builder->GetInsertBlock()은 지금 IR을 넣고 있는 basic block을 가져온다. 여기에 getParent()를 호출하면 그 block이 들어 있는 Function을 얻는다.
ThenBB는 만들 때 TheFunction을 넘겼기 때문에 바로 함수 안에 삽입된다. 반면 ElseBB, MergeBB는 아직 함수에 붙이지 않은 상태다. 뒤에서 적당한 순서로 붙인다.
그리고 CreateCondBr로 조건 분기를 만든다. 이 시점에서 현재 block은 then이나 else로 빠져야 하므로 terminator가 생긴다. basic block의 끝에는 br, ret 같은 terminator가 있어야 한다는 것도 여기서 다시 보인다.
이제 then 쪽 코드를 만든다.
// Emit then value.
Builder->SetInsertPoint(ThenBB);

Value *ThenV = Then->codegen();
if (!ThenV)
  return nullptr;

Builder->CreateBr(MergeBB);
// Codegen of 'Then' can change the current block, update ThenBB for the PHI.
ThenBB = Builder->GetInsertBlock();
삽입 위치를 ThenBB로 바꾼 뒤 then expression의 IR을 만든다. 그리고 끝나면 MergeBB로 가는 무조건 분기를 추가한다.
마지막 줄에서 ThenBB를 다시 가져오는 게 처음에는 이상해 보였다. 이유는 Then->codegen() 안에서 또 다른 if나 for가 만들어질 수 있기 때문이다. 그러면 Builder의 현재 삽입 block이 처음의 ThenBB가 아니라 더 안쪽에서 새로 만들어진 block으로 바뀔 수 있다. phi node에는 실제로 merge block으로 들어오는 마지막 predecessor block을 넣어야 하므로 다시 읽어온다.
else도 거의 같다.
// Emit else block.
TheFunction->insert(TheFunction->end(), ElseBB);
Builder->SetInsertPoint(ElseBB);

Value *ElseV = Else->codegen();
if (!ElseV)
  return nullptr;

Builder->CreateBr(MergeBB);
// codegen of 'Else' can change the current block, update ElseBB for the PHI.
ElseBB = Builder->GetInsertBlock();
ElseBB는 아직 함수에 안 붙어 있었으니 insert로 함수 끝에 추가한다. 그 다음은 then과 같은 흐름이다.
마지막으로 합류 block과 phi node를 만든다.
// Emit merge block.
TheFunction->insert(TheFunction->end(), MergeBB);
Builder->SetInsertPoint(MergeBB);
PHINode *PN =
  Builder->CreatePHI(Type::getDoubleTy(*TheContext), 2, "iftmp");

PN->addIncoming(ThenV, ThenBB);
PN->addIncoming(ElseV, ElseBB);
return PN;
CreatePHI의 두 번째 인자 2는 incoming 값이 두 개쯤 올 거라고 미리 알려주는 값이다. 그 다음 addIncoming으로 "이 block에서 왔으면 이 값"이라는 쌍을 넣는다.
이렇게 만들어진 PN 자체가 if expression의 결과값이 된다.
For 루프 표현식
조건이 충족되고 있다면 계속 로직을 반복 실행하는 루프 표현식도 만들어보자.
Kaleidoscope의 for는 이런 모양이다.
extern putchard(char);
def printstar(n)
  for i = 1, i < n, 1.0 in
    putchard(42);  # ascii 42 = '*'

# print 100 '*' characters
printstar(100);
C의 for (init; cond; step)과 비슷하지만 문법은 조금 다르다.
for i = start, condition, step in body
여기서 두 번째 expression은 "끝값"이라기보다 계속 반복할지 정하는 조건이다. 코드에서는 End라는 이름을 써서 끝값처럼 보이는데, 실제로는 결과가 0.0이 아니면 loop를 계속 돌고 0.0이면 빠져나오는 조건식이다.
Lexer와 AST
Lexer에는 for, in keyword를 추가한다.
tok_for = -9,
tok_in = -10,
lexer에 토큰 추가하는 건 동일하고, AST에는 조금 변화가 있다.
/// ForExprAST - Expression class for for/in.
class ForExprAST : public ExprAST {
  std::string VarName;
  std::unique_ptr<ExprAST> Start, End, Step, Body;

public:
  ForExprAST(const std::string &VarName, std::unique_ptr<ExprAST> Start,
             std::unique_ptr<ExprAST> End, std::unique_ptr<ExprAST> Step,
             std::unique_ptr<ExprAST> Body)
    : VarName(VarName), Start(std::move(Start)), End(std::move(End)),
      Step(std::move(Step)), Body(std::move(Body)) {}

  Value *codegen() override;
};
시작값, 조건, step, body가 추가되기 때문이다. Step은 생략 가능하고, 생략했을 때 기본값 처리는 codegen에서 할거다.
Parser 확장
파서는 아래와 같다.
/// forexpr ::= 'for' identifier '=' expr ',' expr (',' expr)? 'in' expression
static std::unique_ptr<ExprAST> ParseForExpr() {
  getNextToken();  // eat the for.

  if (CurTok != tok_identifier)
    return LogError("expected identifier after for");

  std::string IdName = IdentifierStr;
  getNextToken();  // eat identifier.

  if (CurTok != '=')
    return LogError("expected '=' after for");
  getNextToken();  // eat '='.

  auto Start = ParseExpression();
  if (!Start)
    return nullptr;
  if (CurTok != ',')
    return LogError("expected ',' after for start value");
  getNextToken();

  auto End = ParseExpression();
  if (!End)
    return nullptr;

  // The step value is optional.
  std::unique_ptr<ExprAST> Step;
  if (CurTok == ',') {
    getNextToken();
    Step = ParseExpression();
    if (!Step)
      return nullptr;
  }

  if (CurTok != tok_in)
    return LogError("expected 'in' after for");
  getNextToken();  // eat 'in'.

  auto Body = ParseExpression();
  if (!Body)
    return nullptr;

  return std::make_unique<ForExprAST>(IdName, std::move(Start),
                                       std::move(End), std::move(Step),
                                       std::move(Body));
}
이 코드에서 재밌는 건 step을 선택적으로 처리한다는 점이다. 기본값 처리는 codegen에서 할거다.
For 루프 코드 생성
5장 시점의 for는 loop variable을 phi node로 직접 만든다. 7장에서 mutable variable을 넣으면 이 부분도 alloca/load/store 방식으로 바뀐다.
시작 값을 먼저 정한다.
Value *ForExprAST::codegen() {
  // Emit the start code first, without 'variable' in scope.
  Value *StartVal = Start->codegen();
  if (!StartVal)
    return nullptr;
if/then/else에서 본 것과 비슷하다.
Function *TheFunction = Builder->GetInsertBlock()->getParent();
BasicBlock *PreheaderBB = Builder->GetInsertBlock();
BasicBlock *LoopBB =
    BasicBlock::Create(*TheContext, "loop", TheFunction);

// Insert an explicit fall through from the current block to the LoopBB.
Builder->CreateBr(LoopBB);
PreheaderBB는 loop에 들어가기 직전 block이다. loop 변수의 첫 값은 이 block에서 들어온 값으로 보면 된다.
이제 삽입 위치를 loop block으로 바꾸고, loop variable을 phi node로 만든다.
// Start insertion in LoopBB.
Builder->SetInsertPoint(LoopBB);

// Start the PHI node with an entry for Start.
PHINode *Variable = Builder->CreatePHI(Type::getDoubleTy(*TheContext),
                                       2, VarName);
Variable->addIncoming(StartVal, PreheaderBB);
처음 loop에 들어올 때는 StartVal을 사용한다. 반복이 한 번 끝나고 다시 돌아올 때는 뒤에서 만들 NextVar를 사용한다. 그래서 phi에는 incoming 값이 두 개 필요하다.
loop 변수는 현재 스코프에서 참조 가능해야 하므로 NamedValues에 넣는다.
// Within the loop, the variable is defined equal to the PHI node.  If it
// shadows an existing variable, we have to restore it, so save it now.
Value *OldVal = NamedValues[VarName];
NamedValues[VarName] = Variable;

// Emit the body of the loop.  This, like any other expr, can change the
// current BB.  Note that we ignore the value computed by the body, but don't
// allow an error.
if (!Body->codegen())
  return nullptr;
이미 같은 이름의 변수가 있을 수도 있으니 OldVal에 저장해둔다. 이 루프 안에서는 새 loop variable이 그 이름을 가리고, 루프가 끝나면 원래 값을 복구한다. 이게 shadowing 처리다.
body의 결과값은 사용하지 않는다. for expression 자체는 나중에 그냥 0.0을 반환한다. 예제에서는 putchard(42)가 문자를 출력하는 게 목적이니까 body의 반환값은 별 의미가 없다.
다음은 step이다.
// Emit the step value.
Value *StepVal = nullptr;
if (Step) {
  StepVal = Step->codegen();
  if (!StepVal)
    return nullptr;
} else {
  // If not specified, use 1.0.
  StepVal = ConstantFP::get(*TheContext, APFloat(1.0));
}

Value *NextVar = Builder->CreateFAdd(Variable, StepVal, "nextvar");
step이 없으면 1.0을 쓴다. 그 다음 현재 loop variable에 step을 더해서 다음 반복에서 사용할 값을 만든다.
이제 반복 조건을 만든다.
// Compute the end condition.
Value *EndCond = End->codegen();
if (!EndCond)
  return nullptr;

// Convert condition to a bool by comparing non-equal to 0.0.
EndCond = Builder->CreateFCmpONE(
    EndCond, ConstantFP::get(*TheContext, APFloat(0.0)), "loopcond");
EndCond라는 이름 때문에 "끝값"처럼 보이지만, 실제로는 조건 expression이다. 0.0이 아니면 loop를 한 번 더 돈다.
그리고 loop 뒤 block을 만들고 조건 분기를 넣는다.
// Create the "after loop" block and insert it.
BasicBlock *LoopEndBB = Builder->GetInsertBlock();
BasicBlock *AfterBB =
    BasicBlock::Create(*TheContext, "afterloop", TheFunction);

// Insert the conditional branch into the end of LoopEndBB.
Builder->CreateCondBr(EndCond, LoopBB, AfterBB);

// Any new code will be inserted in AfterBB.
Builder->SetInsertPoint(AfterBB);
EndCond가 참이면 LoopBB로 돌아가고, 거짓이면 AfterBB로 빠진다. 여기서 LoopEndBB도 다시 가져온다. body나 step, 조건 expression의 codegen 과정에서 현재 block이 바뀔 수 있기 때문이다.
마지막으로 phi의 backedge 값을 채우고 스코프를 복구한다.
// Add a new entry to the PHI node for the backedge.
Variable->addIncoming(NextVar, LoopEndBB);

// Restore the unshadowed variable.
if (OldVal)
  NamedValues[VarName] = OldVal;
else
  NamedValues.erase(VarName);

// for expr always returns 0.0.
return Constant::getNullValue(Type::getDoubleTy(*TheContext));
LoopEndBB에서 다시 loop로 돌아오면 phi는 NextVar를 선택한다. 처음 진입할 때는 StartVal, 반복해서 돌아올 때는 NextVar가 되는 구조다.
이번 장은 거의 SSA랑 Phi에 대한 설명이었다.
SSA는 "값은 한 번만 정의된다"는 IR 표현 방식이고, Phi는 "여러 제어 흐름 중 어디서 왔는지에 따라 값을 고르는 장치"다.
SSA는 좀 익숙한데, Phi가 좀 어렵다.
Phi가 조건문이 아님을 확실하게 인지하고 들어가면 좋다. phi 자체가 조건을 검사하는 것이 아니며, phi의 기준은 조건이 아니라 직접 Basic Block이다.
entry:
  br i1 %cond, label %then, label %else

then:
  %a = call double @foo()
  br label %ifcont

else:
  %b = call double @bar()
  br label %ifcont

ifcont:
  %result = phi double [ %a, %then ], [ %b, %else ]
  ret double %result
이렇게 되어있으면 ifcont 입장에서는 들어가는 경로가 then, else 두개다. 이 경로에 따라 다르게 분류하는 것이 phi다.
좀 더 있어보이게 설명하면 합류지점에서 현재 블록에 도달하기 직전에 어떤 predecessor block을 거쳤는지, 그 block에 대응하는 값을 선택한다.
또 그렇기 때문에 일반 명령보다 앞에 있어야된다.
지금처럼 간단한 if나 for는 직접 phi를 만들 수 있는데, 나중에 mutable variable이 들어오면 이걸 사람이 계속 맞추기가 힘들어진다.